
Expenses
Overview
To keep track of purchases, the Expenses API helps to record transactions made on Cards, and facilitates uploading and submission of receipts. Receipts can then be reviewed and approved by the corresponding team.
Create Expense Categories
Expense categories make it easier to group different types of purchases, and helps in later stages to filter and search for any particular transactions. To create expense categories:
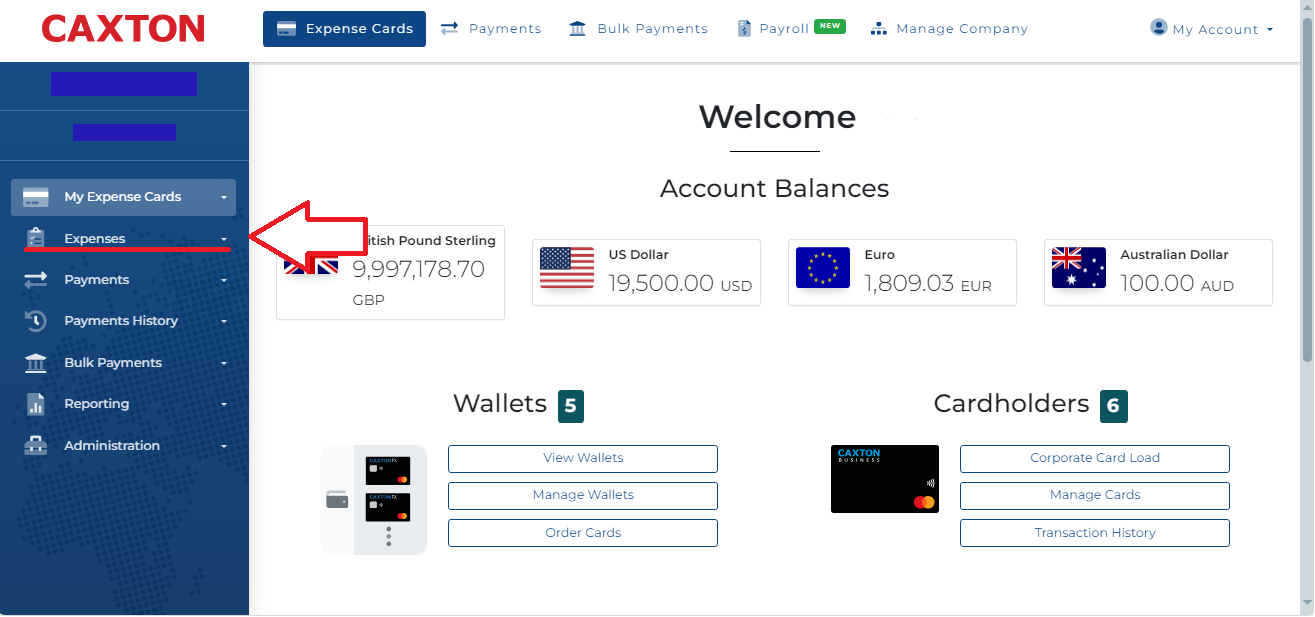
- Log in to the CXTN portal using the Main Account credentials.
- Select Expense Cards from the top-nav menu.

- Select Expenses from the left sidebar menu.
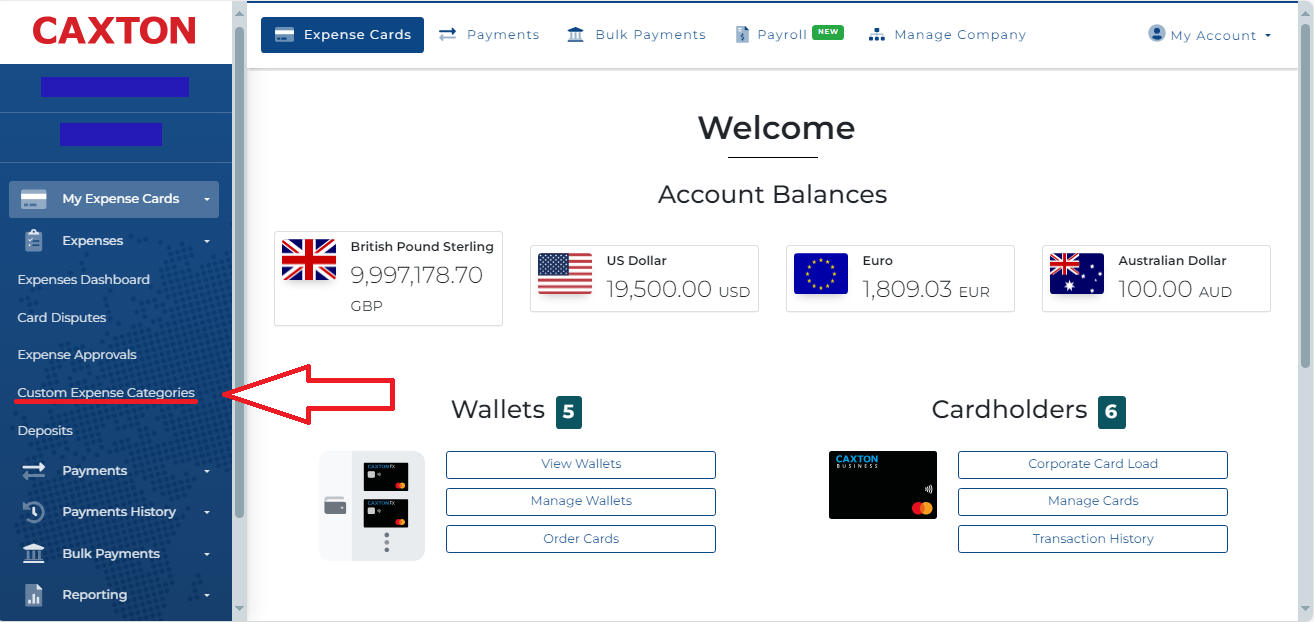
- Select Custom Expense Categories from the drop-down menu.
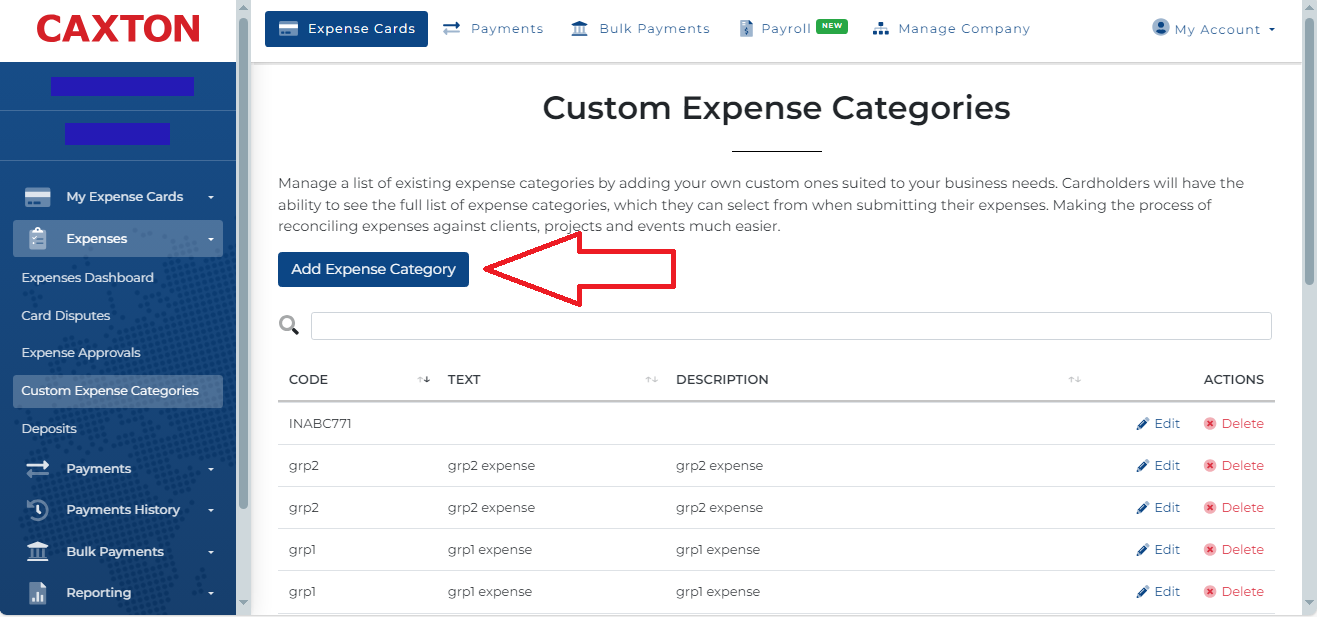
- Select Add Expense Category.
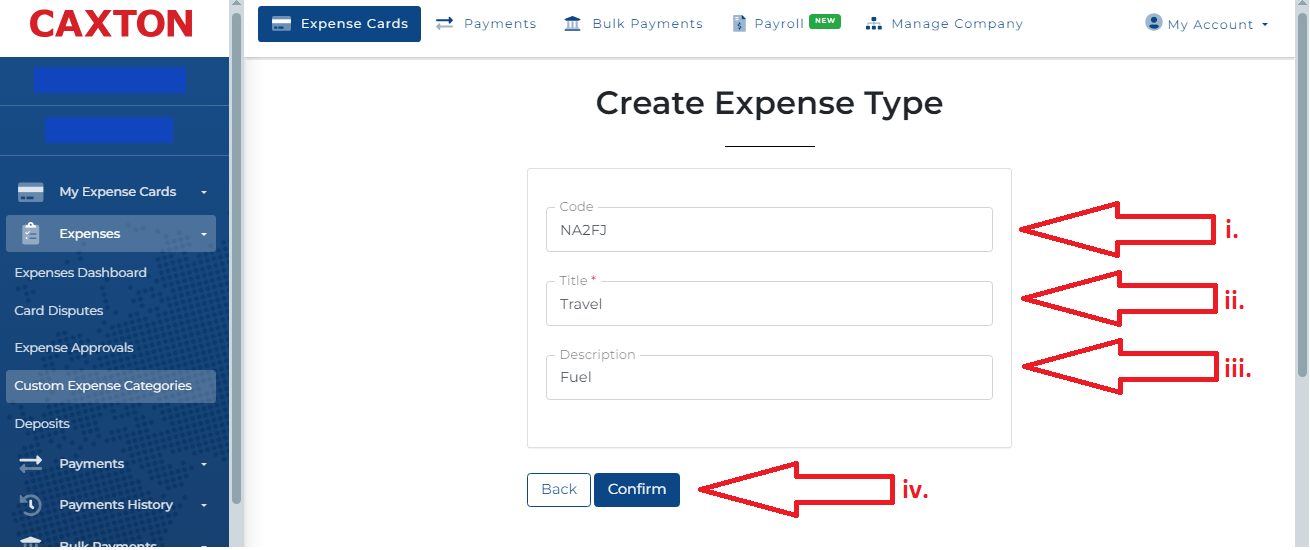
- To Create an Expense Type:
- Enter a Code. This code, identifies the Expense Type.
- Enter a Title for the Expense Type. E.g. Stationary, Travel, Meals.
- Enter a Description. E.g. Pens, Fuel, Lunch.
- Select Confirm.
Submit an Expense
To submit an expense:
- List Recent Card Transactions to establish whether the transaction for the expense being submitted is Pending or Settled.
- Call
[POST - Submit Expense](https://dev.caxton.io/reference/expensesapi_submitexpense). - Enter the
WalletId. - Enter the
CardId. - Enter the
ExpenseTypeId. Call[GET - Retrieve all expense categories](https://dev.caxton.io/reference/expensesapi_getexpensetypes)to find the the corresponding expense category. - Enter a
ValitorTransactionIdif the transaction is Settled or anAuthorizationNumberif the transaction is Pending. - A successful response creates a
Valueto identify the expense submitted.
REQUEST
curl --location 'https://caxapi-integration.azurewebsites.net/api/expenses/expense' \
--header 'authorization: Bearer <access_token>' \
--header 'UserApiToken: <userapitoken>' \
--header 'Content-Type: application/json' \
--data '{
	"walletid": "123456",
	"CardId":12345678,
	"TransactionId":"0",
	"ExpenseTypeId":"274",
  "AuthorizationNumber":202607017

}'
RESPONSE
{
    "LoggedInUserName": "<LoggedInUserName>",
    "MainAccountHolderName": "<MainAccountHolderName>",
    "Content": {
        "Model": {
            "Value": 12345,
            "ApiStatusCode": 100,
            "ApiStatus": "IsValid",
            "ApiStatusDescription": "Valid Operation"
        },
        "ExpectedResponses": [
            "IsValid"
        ]
    },
    "AuthorisedClientModel": {
        "ClientId": "<ClientId>",
        "ClientRef": "<ClientRef>",
        "UserId": "<UserId>",
        "TokenStartDate": "2023-02-20T09:40:29.5704773",
        "TokenEndDate": "2034-02-13T17:19:55.7079055",
        "ApiStatusCode": 100,
        "ApiStatus": "IsValid",
        "ApiStatusDescription": "Valid Operation"
    },
    "AuthorisedUserModel": {
        "UserId": "<UserId>",
        "AppVersion": null,
        "TokenStartDate": "2024-02-16T00:00:00",
        "TokenEndDate": "2024-05-16T00:00:00",
        "LoginTimestamp": "2024-02-16T17:21:18.6794405",
        "ApiLoginType": 0,
        "ApiStatusCode": 100,
        "ApiStatus": "IsValid",
        "ApiStatusDescription": "Valid Operation"
    }
}
Upload an Expense Receipt
To upload a receipt:
- Call
[POST - Submit a receipt](https://dev.caxton.io/reference/expensesapi_uploadreceiptasync). - Enter the
TransactionId. - Upload the receipt from your local machine or storage device.
- A successful response creates an Id for the receipt associated with the expense.
REQUEST
curl --location 'https://caxapi-integration.azurewebsites.net/api/expenses/expense/12345/receipts' \
--header 'authorization: Bearer <access_token>' \
--header 'userapitoken: <userapitoken>' \
--header 'Content-Type: application/json' \
--form '=@"/C:/Users/John.Doe/OneDrive - /FuelReceipt.jpg"'
RESPONSE
{
    "LoggedInUserName": "<LoggedInUserName>",
    "MainAccountHolderName": "<MainAccountHolderName>",
    "Content": {
        "Model": {
            "Receipts": [
                {
                    "Id": 87,
                    "ExpenseId": 12345,
                    "FileName": "FuelReceipt.jpg",
                    "FileUrl": "https://cfxcustomerportaltest.blob.core.windows.net/card-expense/12345/FuelReceipt.jpg?sv=2019-07-07&sr=b&sig=SnG7Jooivi4sdZ8FqHBcQBs5vW%2BnD2xMHhuDmzB10D0%3D&se=2024-02-22T09%3A47%3A50Z&sp=r",
                    "ApiStatusCode": 100,
                    "ApiStatus": "IsValid",
                    "ApiStatusDescription": "Valid Operation"
                }
            ],
            "ApiStatusCode": 100,
            "ApiStatus": "IsValid",
            "ApiStatusDescription": "Valid Operation"
        },
        "ExpectedResponses": [
            "IsValid"
        ]
    },
    "AuthorisedClientModel": {
        "ClientId": "<ClientId>",
        "ClientRef": "<ClientRef>",
        "UserId": "<UserId>",
        "TokenStartDate": "2023-02-20T09:40:29.5704773",
        "TokenEndDate": "2034-02-13T17:19:55.7079055",
        "ApiStatusCode": 100,
        "ApiStatus": "IsValid",
        "ApiStatusDescription": "Valid Operation"
    },
    "AuthorisedUserModel": {
        "UserId": "<UserId>",
        "AppVersion": null,
        "TokenStartDate": "2024-02-16T00:00:00",
        "TokenEndDate": "2024-05-16T00:00:00",
        "LoginTimestamp": "2024-02-16T17:21:18.6794405",
        "ApiLoginType": 0,
        "ApiStatusCode": 100,
        "ApiStatus": "IsValid",
        "ApiStatusDescription": "Valid Operation"
    }
}
Remove an Expense Receipt
In the example below, the same receipt uploaded in earlier steps is removed. To remove an expense receipt:
- Call
[DEL - Remove receipt](https://dev.caxton.io/reference/expensesapi_removeexpensereceipt). - Enter the Expense Id, in the example below this is "12345"
- Enter the receipt Id, in the example below this is "87".
- A successful response removes the receipt from the associated expense. To check if the receipt is removed, call
GET - Expense Details.
REQUEST
curl --location --request DELETE 'https://caxapi-integration.azurewebsites.net/api/expenses/expense/12345/receipts/87' \
--header 'authorization: Bearer <access_token>' \
--header 'userapitoken: <userapitoken>' \
RESPONSE
{
    "LoggedInUserName": "<LoggedInUserName>",
    "MainAccountHolderName": "<MainAccountHolderName>",
    "Content": {
        "Model": {
            "ApiStatusCode": 100,
            "ApiStatus": "IsValid",
            "ApiStatusDescription": "Valid Operation"
        },
        "ExpectedResponses": [
            "IsValid"
        ]
    },
    "AuthorisedClientModel": {
        "ClientId": "<ClientId>",
        "ClientRef": "<ClientRef>",
        "UserId": "<UserId>",
        "TokenStartDate": "2023-02-20T09:40:29.5704773",
        "TokenEndDate": "2034-03-25T10:32:23.7829169",
        "ApiStatusCode": 100,
        "ApiStatus": "IsValid",
        "ApiStatusDescription": "Valid Operation"
    },
    "AuthorisedUserModel": {
        "UserId": "<UserId>",
        "AppVersion": null,
        "TokenStartDate": "2024-02-16T00:00:00",
        "TokenEndDate": "2024-05-16T00:00:00",
        "LoginTimestamp": "2024-03-27T10:16:14.5844074",
        "ApiLoginType": 0,
        "ApiStatusCode": 100,
        "ApiStatus": "IsValid",
        "ApiStatusDescription": "Valid Operation"
    }
}
Update an Expense
Expenses can only be updated if they have not yet been processed. To update an expense:
- Call
[PUT - Update an expense](https://dev.caxton.io/reference/expensesapi_updateexpenserecord). - Enter the
ExpenseTypeId. - Add a
Noteto describe the expense.
REQUEST
curl --location --request PUT 'https://caxapi-integration.azurewebsites.net/api/expenses/expense/12345' \
--header 'authorization: Bearer <access_token>' \
--header 'userapitoken: <userapitoken>' \
--header 'Content-Type: application/json' \
--data '{
	"ExpenseTypeId":"237",
	"Note": "expense amended via api update",
	"VatReference":"33"
}'
RESPONSE
{
    "LoggedInUserName": "<LoggedInUserName>",
    "MainAccountHolderName": "<MainAccountHolderName>",
    "Content": {
        "Model": {
            "ApiStatusCode": 100,
            "ApiStatus": "IsValid",
            "ApiStatusDescription": "Valid Operation"
        },
        "ExpectedResponses": [
            "IsValid"
        ]
    },
    "AuthorisedClientModel": {
        "ClientId": "<ClientId>",
        "ClientRef": "<ClientRef>",
        "UserId": "<UserId>",
        "TokenStartDate": "2023-02-20T09:40:29.5704773",
        "TokenEndDate": "2034-03-25T10:15:37.1452949",
        "ApiStatusCode": 100,
        "ApiStatus": "IsValid",
        "ApiStatusDescription": "Valid Operation"
    },
    "AuthorisedUserModel": {
        "UserId": "<UserId>",
        "AppVersion": null,
        "TokenStartDate": "2024-02-16T00:00:00",
        "TokenEndDate": "2024-05-16T00:00:00",
        "LoginTimestamp": "2024-03-27T10:16:14.5844074",
        "ApiLoginType": 0,
        "ApiStatusCode": 100,
        "ApiStatus": "IsValid",
        "ApiStatusDescription": "Valid Operation"
    }
}
Remove an Expense
To remove an expense that is already submitted:
- Call
DEL - Remove expense. - Enter the
TransactionId. - A successful response removes the expense from the records. To check if the expense is removed, call
[GET - Retrieve expense details](https://dev.caxton.io/reference/expensesapi_getexpensedetails)
REQUEST
curl --location --request DELETE 'https://caxapi-integration.azurewebsites.net/api/expenses/expense/12345' \
--header 'authorization: Bearer <access_token>' \
--header 'userapitoken: <userapitoken>' \
--header 'Content-Type: application/json' \
--data ''
RESPONSE
{
    "LoggedInUserName": "<LoggedInUserName>",
    "MainAccountHolderName": "<MainAccountHolderName>",
    "Content": {
        "Model": {
            "ApiStatusCode": 100,
            "ApiStatus": "IsValid",
            "ApiStatusDescription": "Valid Operation"
        },
        "ExpectedResponses": [
            "IsValid"
        ]
    },
    "AuthorisedClientModel": {
        "ClientId": "<ClientId>",
        "ClientRef": "<ClientRef>",
        "UserId": "<UserId>",
        "TokenStartDate": "2023-02-20T09:40:29.5704773",
        "TokenEndDate": "2034-03-25T10:15:37.1452949",
        "ApiStatusCode": 100,
        "ApiStatus": "IsValid",
        "ApiStatusDescription": "Valid Operation"
    },
    "AuthorisedUserModel": {
        "UserId": "<UserId>",
        "AppVersion": null,
        "TokenStartDate": "2024-02-16T00:00:00",
        "TokenEndDate": "2024-05-16T00:00:00",
        "LoginTimestamp": "2024-03-27T10:16:14.5844074",
        "ApiLoginType": 0,
        "ApiStatusCode": 100,
        "ApiStatus": "IsValid",
        "ApiStatusDescription": "Valid Operation"
    }
}